How to Optimize Ecommerce Images for More Sales: A Guide to Image SEO & Conversion
How much attention do you pay to your store’s image optimization?
Often times, brands get caught up on overthinking a logo – spending days, weeks or even months before they launch a great idea just trying to figure out what symbol is appropriate for a brand they haven’t even started yet.
And then, when it comes time to actually launching, way too many entrepreneurs spend much too little time focusing on great product photography and branded imagery.
And yet, imagery continues to be the catalyst of our era – the communication vehicle through which people understand value or disregard and move on to the next.
Only video matches the picture’s power in this respect.
And you use your pictures everywhere:
On your product pages.
On your category pages.
On your homepage.
In your abandoned cart messages.
On your blog.
On your social accounts.
For your Facebook Advertising.
For your Google Shopping stream.
In fact, the only thing you don’t use images for is Google AdWords. And Google AdWords is often the most expensive PPC you’ll have.
What is Google’s Speed Update?
Despite image-less AdWords, Google is heavily invested in your brand and product images as well.
In January 2018, the company announced that mobile search algorithms will begin to take page load speed into account beginning July 2018.
This is being dubbed the Speed Update.
And there are 2 things that slow down page load speed:
Way too much javascript often caused by too many apps and not enough built-in to your site.
Way too large of images that are not optimized for screen size.
Platforms like BigCommerce alleviate these issue for you by:
Building in more functionality to the platform. On average, BigCommerce stores use 2-5 apps. On other SaaS platforms, average is +15.
The truth about image optimization, speed & your bottom line
Yes, images are one of if not the most important asset for your ecommerce store.
And yet, too often they are neglected –– store owners completely forgetting to optimize images for web.
Why?
Because optimizing your images for the web is just one additional step in a never ending to do list.
It is often seen as low priority, and thus forgotten.
But if you want to improve your conversion rate, your customer engagement, your loyalty and your lifetime value –– well, you need to start by paying more attention to your imagery.
But where should you start?
We’ve got you covered.
In this guide we’ll go through the most important concepts for you to understand regarding your images, and show you how you can begin implementing tips to increase conversion – right now.
Why images are so important
Before we jump in, it’s important to understand why images can have such a big impact on your store. Here’s a high-level view.
1. First impressions count.
Images are the first thing your customers see when looking at a product page, and those first few seconds can be crucial in determining if the product is what they are looking for.
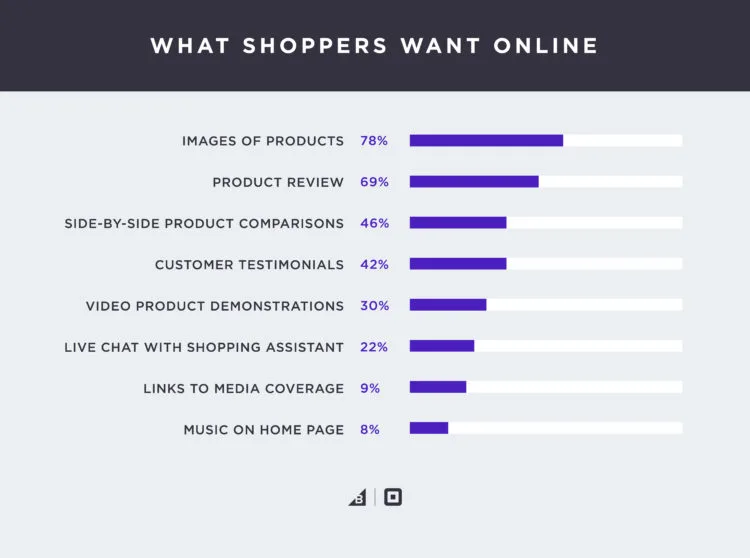
In fact, in a 2017 study commissioned by BigCommerce and Square, American online shoppers cited additional product photography as the #1 thing they want more of from online brands.
2. A picture is worth 1000 words.
Images help a customer ascertain the quality and details of a product better than any description.
In lieu of being able to feel the product as in a retail store, great product photography lets the user explore the various details of the product up close.
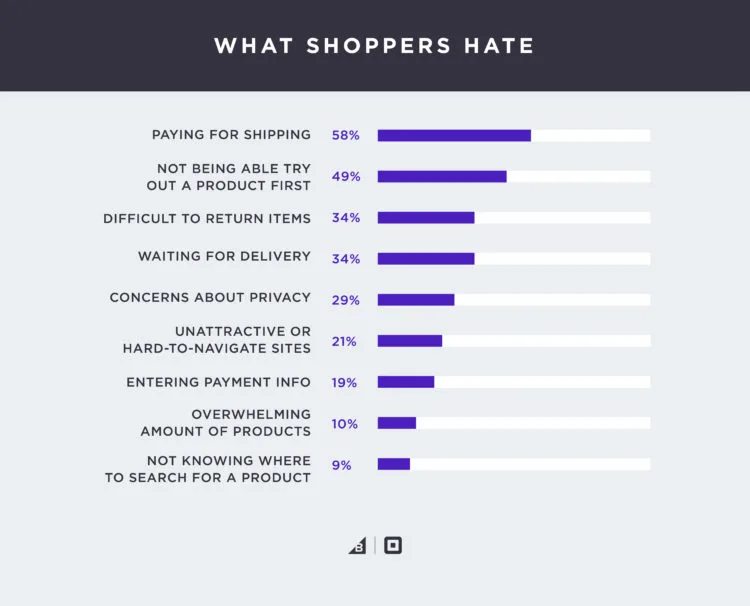
Indeed, in that same study by BigCommerce and Square, nearly half of respondents (49%) cited not being able to touch, feel or try a product as one of their least favorite aspects of online shopping.
This was the second most hated aspect of online shopping in the study.
3. Mobile is taking over.
As mobile shopping becomes increasingly prevalent, images will only become more important –– as evidenced by Google’s Speed Update move.
User’s are increasingly using images instead of text to judge the suitability of the product and even to navigate.
Do you think a customer will read each description first or look at the photo?
Having clearer, more appealing ecommerce product images means your products will get looked at, clicked on and bought more often.
4. Images can actually hurt your website.
Using unprofessional or poorly optimized images for web can have a major impact on your shopping experience and even where you rank in search engines.
Do your images load slowly?
Have you not added meta description?
Are people bouncing as soon as they land there?
You won’t ever get to Page 1 with that kind of behavior.
With that in mind, let’s walk through how you can make sure you have professional-quality and optimised photography on your ecommerce store.
Optimizing Images & Photos: A Quick Guide
The first step to optimizing your product photography (or any image on your site) is to first start with great photos. And, if you need help finding professional images to use on your website, check out this comprehensive resource: 35+ Sites to Get Free Stock Images for Commercial Use.
But after that, a lot of the optimization process is behind-the-scenes.
In fact, optimizing your photos can be the strategic advantage you need to crush the competition.
They can’t see what you’re doing after all, but you’ll get higher search rankings which means:
More clicks.
More sales.
Combine that with the power and customizability of your site’s SEO (i.e. complete URL control across the board), and you’ll win on Google.
Let’s look at how to do this despite what platform you are on.
1. Start with good photos.
Having great ecommerce photography starts with taking the right picture.
Your photography doesn’t have to involve an expensive camera or setup. In fact, you can create your own DIY photography setup that will do the job.
But there are a few tips you can follow to make sure you are starting off with the best possible photos.
Make sure you have the right setup.
An ecommerce photography setup doesn’t have to be expensive, but if you’re just getting started there are a few things you should invest in to take quality photos:
A consumer DSLR camera or smartphone. Most smartphones today have a camera that will be more than adequate for taking standard product photos. Using a smartphone also gives you access to hundreds of photography apps.
A light source. Having a light source helps to provide even illumination of your image and will make a huge difference to the quality of your photos. If you’re starting out you might find it easier to work with a natural light source. In this case, using a fill light will help you eliminate the shadows on your image.
A white sweep. The sweep will help diffuse the lighting across your image evenly and make editing your photos later much easier. This can be anything from a white sheet to rolls of paper.
A steady surface. If you’re taking a number of photos, having a steady surface makes it easy to keep your images consistently placed.
A camera tripod. Likewise, having a camera tripod ensures you can get consistently position photos every time. It also makes it easy to readjust your products without having to juggle a camera at the same time.
2. Showcase your products with multiple angles.
Look at any successful online store and you’ll rarely see one using just a single photo for any of their images.
Product photography can be used to showcase the best aspects of the product, so it’s important to include a variety of shots.
You can do this without models as well. Look at this example from KAOS.
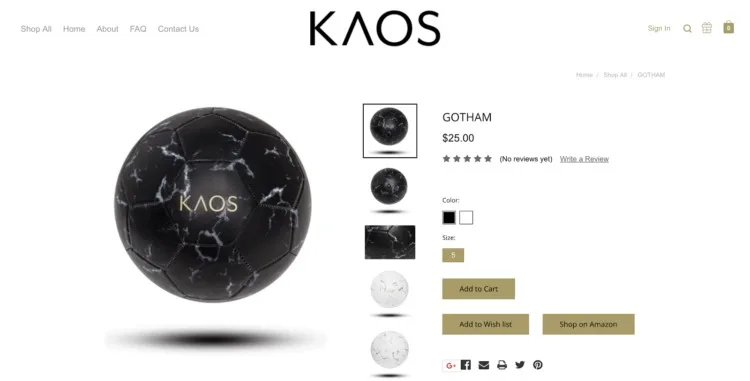
Different photos can help showcase different aspects.
Long-shots showing the product on a model can help the user visualize how the product will look in a real-life situation.
Medium shots help them ascertain the overall look of the product itself.
Close-ups illustrate the finer details and quality of the product that can really sell its value.
3. Use a white background for your products.
Replacing the background of photos with a white background ensures that you will have consistently great looking images, no matter their order on your site or how you use them across the web.
White backgrounds are standard on almost every online store, and there are a few very good reasons for that:
Your products will POP on a white background
Your images will look consistent on collection pages
It will save you money and time in editing
You can easily reuse or replace the background on any of your photos
Marketplaces like Google Shopping and Amazon now require white backgrounds

Using white-background images makes products easy to compare. Source: jenis.
You can use software such as Photoshop or Pixlr to manually replace the background of your product photos with a white background, or let services like Pixc do the work for you.
4. Save your images with the right dimensions.
Paying attention to the dimension of your image is crucial if you aren’t on BigCommerce.
If too large, you will cause issues with your page load time.
If too small, your images will look grainy (i.e. poor quality).
Use pixels to measure the dimensions of your images.
Your iPhone will have something in the range of a 12 Megapixel camera, which just means that the photos it takes consist of twelve million pixels. The photos produced by the 12mp camera will be 3000px x 4000px.
For ecommerce photography, that size is unnecessary. On BigCommerce, for instance, the optimal size for your product photos is 1028px by 1028px, while your other photos should be under 1000px on both sides.
Keeping your images square will ensure they display correctly and look good regardless of whether the contents of the photo are longer or taller.
When your images are sufficiently large enough in dimension, then the same image can be scaled down to be used in your thumbnails or in collection images.
And, if you have product zoom enabled, you can display a much higher resolution image.

Images can be scaled down to different sizes. Source: Martha Stewart Cafe Shop
If you don’t have access to software that can resize your images, like Photoshop, don’t worry.
Services like Pixlr, Canva, and Image Resizer can help you with basic editing and resizing needs.
5. Improve page load speeds by using the correct image format.
It’s easy to just choose the default save option when you’re creating your images, but knowing the difference between file formats and settings can have a massive impact on your site.
Your BigCommerce store allows for three different image formats: JPG/JPEG, GIF or PNG. Each of these have different benefits and drawbacks.
GIF files are lower in quality, but also in file size. If you need to create an image specifically for small icons or thumbnails, then you probably want to use a GIF. They’re also the only format available that supports animation (though keep an eye out for APNG). However, as the image size gets bigger, GIFS become less efficient at processing colors,.
PNG files support a wider range of colors, and also the only format that supports transparent backgrounds. However, this all comes at the cost of larger file size. If you need to edit a photo multiple times, you’ll want to export it as a PNG file.
JPEG images are the most common format used by digital cameras and online. They support a wide range of colours, but the JPEG compression settings allow you to strike a balance between image quality and file size.
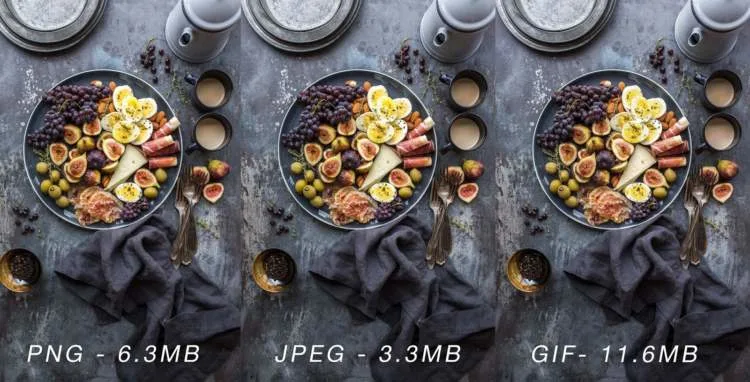
JPEGS offer a good balance between file size and quality, while GIFS offer poor file size for more complex images. Image Source: Brook Lark
6. Experiment with quality settings.
In most cases, JPEG will be the file type of choice for your images. It offers a high quality image at reasonable file sizes.
One of the great benefits about the jpeg file type is the ability to choose the level of compression that you would like. Adjusting the compression settings enables you to reduce the filesize, at the cost of image quality.
Have a look at this example where the same photo has been saved using different levels of compression:

The result of using high, medium and low JPEG compression. Image source: Alex Jones
When not to use JPEG.
While JPEG is the most popular format for web images, there are a few cases where it’s best to use a higher resolution file type like PNG. For example:
When your image is mainly lines, icons or sharp images: JPEG compression may blur the line between the image and the background and make the contrast less apparent.
When the image will undergo multiple edits: The compression will slightly alter the image each time and after several edits, it may noticeably distort the image.
Not on BigCommerce? Compress your images with this free tool.
As we’ve already discussed, images will typically range in file size from a few dozen kilobytes in their compressed form, up to a few megabytes, depending on the file type and level of compression you have used.
If you’re on BigCommerce, once again, you do not need to worry about this section. Move on and read the next section.
For everyone else…let’s start here:
If you’re unfamiliar with the Byte data unit, each Byte is equal to 1024 of the previous one.
So to clarify:
1024 Bytes (b) = 1 Kilobytes (kb). 1024 Kilobytes = 1 Megabyte (mb). 1024mb = 1 Gigabyte (gb)
You don’t have to remember this, but just consider that you typically want to aim for photos that are under 100kb to reduce the time it takes for everything on your page to display.
An iPhone 7’s typical photo file size is around 3mb which translates to 3072kb, or more than 30x optimal image sizes!
Now imagine that you have a gallery of ten photos all of this size on your page, and you start to understand why compressing your images is important.
Most image editing tools will allow you to adjust the level of compression for your JPEG files.
But if your image editing software doesn’t offer good compression options, if you aren’t on a platform that does this automatically for you, or you aren’t sure on the level of quality loss that will be suitable for each image, you can use another tool to make your photo size smaller.
TinyJPG is one such service that is free – a free image optimizer – and will accept both JPG and PNG images.
Instead of you having to guess the right balance between quality and file size, services like TinyJPG analyze the image for you to determine the smallest possible file sizes, while still maintaining optimal image quality.

TinyJPG shows you your original image versus the optimized image.
Even if you already compress your images when saving, you’ll be surprised how much of an impact running them through a service like TinyJPG can have.
Search Engine Image Optimization 101
Images are a fantastic source of organic content that can help your rank better in Google.
There are a few things you should be doing to make sure that you’re getting the most out of your image content.
1.Use informative file names.
Image names are the first piece of information you can provide to Google to let them know what your image is about.
The default file name that come from your camera and looks like a string of numbers does nothing to describe what the photo is actually about.
When naming your images, describe the contents of the photo and use dashes instead of spaces. BigCommerce does not allow spaces in their image file names.
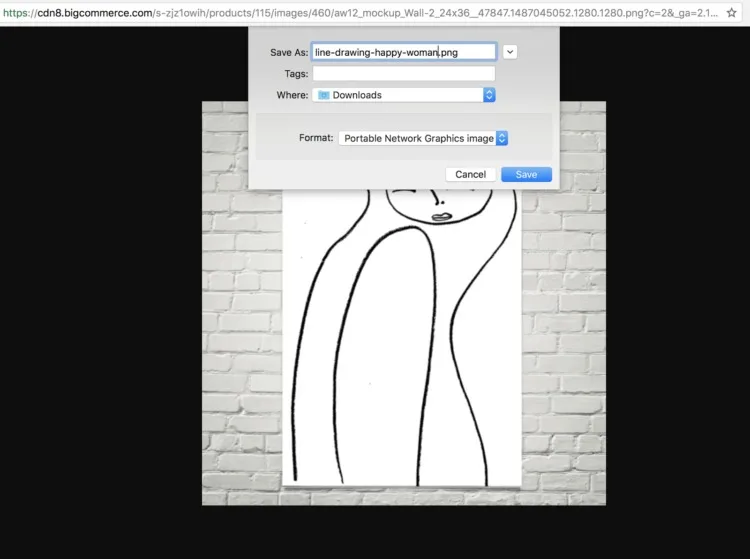
Renaming the file to optimize for keywords, including line drawing and happy woman.
2. Include appropriate alt text.
Alt text is intended as an accessibility feature, and that’s how it should be approached.
If the user is vision impaired, or if the image can’t be loaded, the alt text is what will be displayed.
But alt text is also used by Google to gain a better understanding of what the image contains.
That makes it a valuable spot to include the relevant search term that people looking for your product would search for.
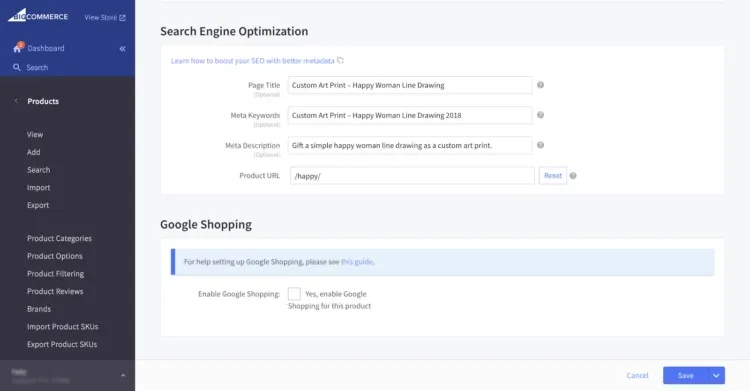
Matching my optimized image file name with my metadata, page title and URL structure on my product page backend.
3. Provide context around your image.
The content that surrounds your image is also important.
Search engines act the same way as your users do, by using the content throughout the page to build up a bigger picture of what the page is about.
This can be particularly valuable on product pages where you can use unique descriptions to better describe the product in the photo.
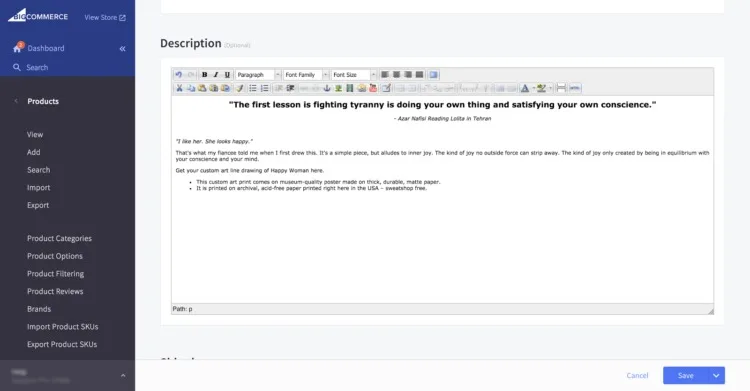
Here, I’ve updated my product description to include all my keywords: custom art print, line drawing, happy woman. I’ve also included additional content and details for branding purposes.
4. Use images to improve the experience.
You can also go above and beyond and create a great user experiences by doing the following with your images:
Use good-quality, non-blurry photos. With smartphones and free editing software available, there’s really no excuse for not having good-quality photos. It makes for a better experience, and people are more likely to link back to pages with better photos.
Place them higher up the page. People don’t always scroll down to the bottom of the page, so make sure your images are higher up the page where readers will have the chance to see them.
Specify the width and height of each image. If the browser knows how big the image will be, it can load the rest of the content in place while it waits for the image to finish downloading. This can reduce the amount of time it takes for your page to load and create a better user experience.
Providing extra SEO information and optimizing your images to provide the best browsing experience will help increase the amount of organic traffic to your site, and improve the amount of time shoppers spend once they’re there.
Trick of the trade: Use open graph to show the right image on social media
The final thing you can do to get the most out of your images is make sure that when someone shares a link to your website, the correct image is shown.
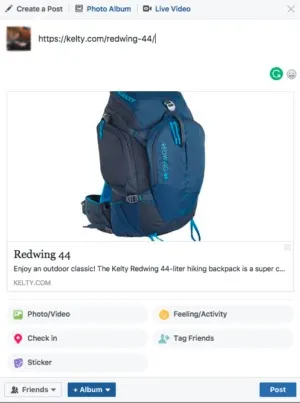
Source: Kelty
By using something called the Open Graph protocol, you can make sure that your best product image is shown, rather than a generic logo or unrelated image.
Here’s where you can do this on the BigCommerce backend for each individual product.
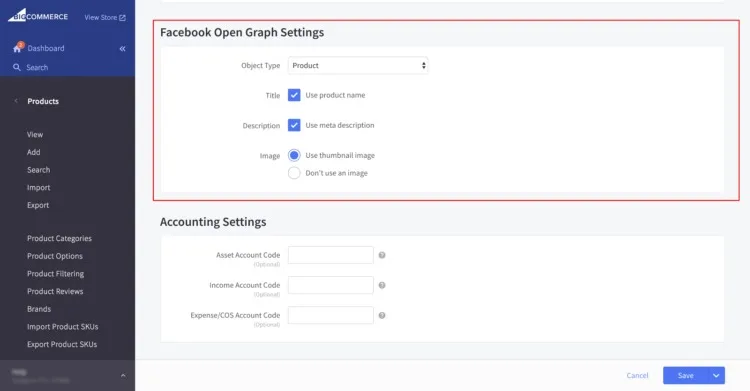
The image you want to use is specified in your page’s header section, similar to how you might specify the title tag and description for the page.
You might find that for certain BigCommerce pages, such as your homepage, you may need to create a separate HTMLHead file where you can specify which image will be used.
Product Image Optimization Checklist
Product images have the power to make or break a sale.
Remember that your customers can’t pick up and feel a product. They rely solely on your descriptions and the visuals you give them — by way of ecommerce product images.
So, are you nailing these best practices when it comes to your product images?
Here’s a checklist to make sure you are – 100% of the time.
1. Set up for success.
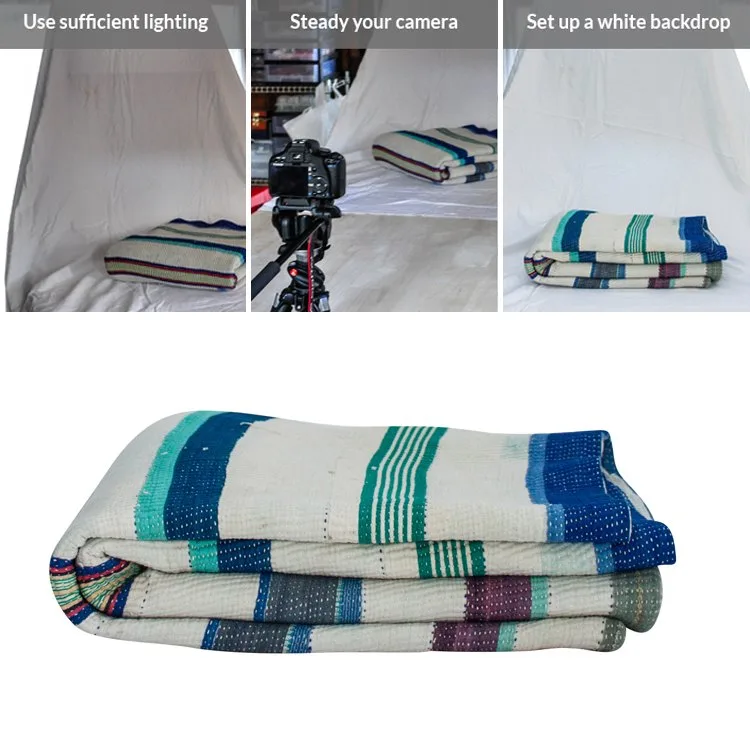
First up, steady your camera with a tripod (or any hard and stable surface) to avoid camera shake.
Next, make sure you shoot with sufficient lighting to light up both your product and the entire photoshoot space. You can do this by using multiple light sources (flashes, strobes and even normal desk lamps will do) but the easiest way is to use natural lighting.
Use the sun as an indirect light source. Take your photo near a window, and if it’s too bright, diffuse the light with white blankets, sheets or paper. Lighting up your product in the shooting stage will produce a better quality photograph and also save you a lot of editing time.
Consider shooting on a white backdrop. It takes a bit of extra time to set up, but it’s easier to remove the background later should you choose to do so, and it will help with your camera’s white balance calibration. On top of that, white reflects light whereas darker colors will absorb it, so your product will naturally turn out nicely brightened and contrasted.
2. Shoot multiple photos.
Everyone loves the convenience of online shopping, but let’s be honest, nothing compares to being able to physically touch the product.
When it comes to online shopping, difficulty visualizing what a product would look like in real life is one of the number one reasons behind purchase resistance. To help your customer visualize a product, take photos from different angles.
Start off with a “hero image”. It’s the first of a series of images of your product. The best option for a hero image is either a front-on shot or a 45-degree angle shot, depending on the product. In some cases, like shoes for example, a side-on shot might be more appropriate. The photo should be simple and feature only the product that you’re selling as to avoid confusing the viewer.
Following on from your hero image, include photos from above, below, the side, the back etc.

3. Take shots in context.
Next up, sell your product with some in-context product photos.
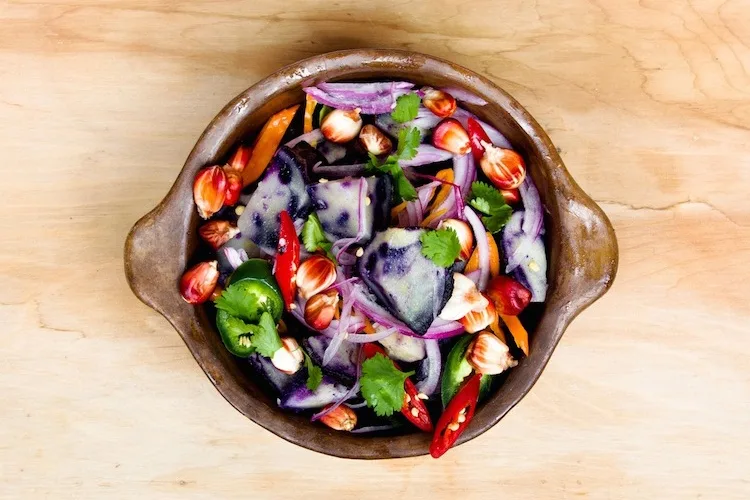
Show photos of your product in use. For example. complement a pair of pants with some nice shoes, a plate with a delicious-looking salad, or a vase with nice flowers.
The viewer should want everything in the photo (including your product wink wink nudge nudge).
However, you should refrain from using this as your hero image, because ultimately you want to show off (and sell) your product, not your photography skills.
4. Clean up finished photos.
There are also a few best practices you should keep in mind after you put the camera down.
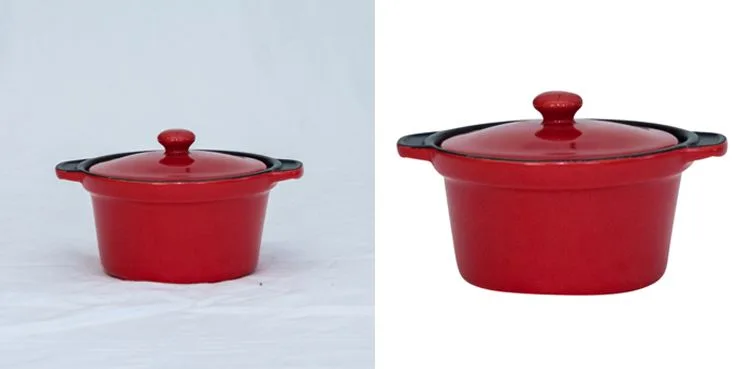
A good idea is to remove the background and let your products do the talking.
Simple, white backgrounds draw attention to the product and will match any website design, so if you decide to change up your template, you won’t have to worry about getting new images.
5. Get the sizing right.
When it comes to uploading your ecommerce product photos onto your store, image size and quality both matter!
When you set up your online store, you choose the product image dimensions for your template.
For the best product image size, I recommend using a template that goes beyond the average 500 and 700 pixels. This is small for an image.
Don’t make the mistake of manually resizing your images to that size before uploading them to BigCommerce.
In fact, lowering the resolution by that many pixels will give you a blurry image. Images of any size, as long as they have the same width to height ratio as the template, will be automatically resized without any cropping or extra space on the sides when you upload them to your online store.
I always recommend 1200px on the longest side of the image to be safe, which also gives you a decent sized image if you choose to use a product zoom feature.
That being said, there is no technology that can make images bigger while keeping them just as clear, so when you set up your template, make sure your product zoom feature is no bigger than the dimensions of the file you upload.
Create a canvas of the size you want in Photoshop and drag your photos into the new canvas, resizing them within the new canvas and not the original files.
If you don’t have Photoshop or want something that’s a bit easier to use, use Canva. Just create a design using custom dimensions, upload your images and resize them in there. It’s too easy!
6. Be consistent.
Finally, you want your images to look consistent.
Your BigCommerce template will make them all the same size, and a white background will keep everything looking nice and neat.
But if you want to make your product images just look a tad more professional, adjust your product photos so that they take up 80-90% of the canvas.
This means that even on a page of differently shaped products, there will still be that element of consistency.
So, there you have it. A product photography and image optimization checklist to ensure your site load quickly, the images look great and you get more sales for less work.
Image Optimization FAQs
Improving your ecommerce stores images is one of the most effective ways to create a better shopping experience for your customers.
Better images can help customers be sure of the products they are buying, help you rank better in search engines and lower your site’s load time.
With the advice you’ve been given in this guide, you have everything you need to start optimizing your ecommerce product images to bring in more traffic and make more sales.
As a wrap up, let’s answer a few brief image optimization FAQs.
What is image compression?
When you first upload an image, the pixel and file size is often much larger than needed for your site.
Image compression compresses an image size (makes it smaller) without sacrificing quality depending on the device the person is viewing the image from.
For example, file size needed for a high quality print photo is very high. For those, you need a hi-resolution (hi-res) image, i.e. 4608 x 3456 image will yield a 15 x 11 print. Needs for web images are lower.
What is lossless compression?
Lossless compression describes the compression of an image file in which all original data can be recovered when the file is uncompressed.
With lossless compression, every single bit of data that was originally in the file remains after the file is uncompressed.
Does your store need to worry about this? It depends.
Best practice is to save all original files in the cloud with a backup. In other words, use Google Drive, Dropbox or Box to save your original, large files.
What is lossy compression?
Lossy compression or irreversible compression describes the compression of an image file in which inexact approximations and partial data discarding are used to represent the content.
This means the original file cannot be restored.
For your online store, if you use this method, you will want to use a cloud storage file with backup to save your original files.
This type of compression will not save your original files, but it will increase page load speed. Image quality, likely will not be noticed depending on the device.
What is the difference between lossy and lossless compression?
The difference between lossy and lossless compression is the way in which the image is compressed.
In lossy compression, you cannot restore the original file.
In lossless compression, you can restore the original file.
Either way, you should store original files in a cloud service with hard drive backup.
Will users notice when product photos are optimized?
No. Images are optimized for device size without affecting the visual quality of the image.
Users will see no discernable difference, other than faster page load speeds.
What other image optimizer tools do you recommend?
Should images be responsive?
Yes, the images on your site should be responsive. This means they are compressed and optimized based on device the browser is using.
BigCommerce stores have this done automatically for them for free. If you use other ecommerce platforms, check with them on offered solutions and costs.
How can non-designers create quality images for a website?
We highly recommend hiring a professional photographers for all product images and using experienced graphic designers to ensure you have the highest quality images on your website. However, tools like Canva, Piktochart, Aviary and LogoGarden can help you create high quality images with little design experience.

Rachel Jacobs is Head of Content at Pixc (@pixcphotos), a leading eCommerce product optimization solution. Pixc provides a service that turns average product images into beautiful ones by editing and removing the background within 24 hours. A lover of all things content and growth, Rachel spends most of her time planning exciting new content, fine-tuning growth strategies and tweaking email campaigns. When Rachel isn't reading, writing or hiking, she'll be cooking up a feast in the kitchen. If you want to increase your product page conversions with professional product images, take advantage of Pixc's free trial.


