- Featured
B2B Edition
Advanced B2B features for enterprise plans.Catalyst
NewCreate stunning, high-performing storefronts that captivate and convert.Feedonomics
Omnichannel feed and data transformation.Multi-Storefront
Manage multiple unique stores from one account.International
Grow your brand across the globe.

- Launch Services
Overview
Chart your path to success with specialized services.Implementation Project Management
Experts to ensure you launch on time and under budget.Solution Architecture
Seasoned advisors to help you best design your store.Data Migration & Optimization
Expertise on a clean and clear path to migrating your data.Enterprise Launch Package
Personal training on how to set up and launch your BigCommerce Store.

Professional Services Blog Series
Get to know our teams and how they support your success in this Q&A series.

The Global B2B Buyer Behavior Report
This in-depth report provides actionable strategies to help you sell more online.
A Step-by-Step Guide to High Quality Product Images Shot with Your Smartphone
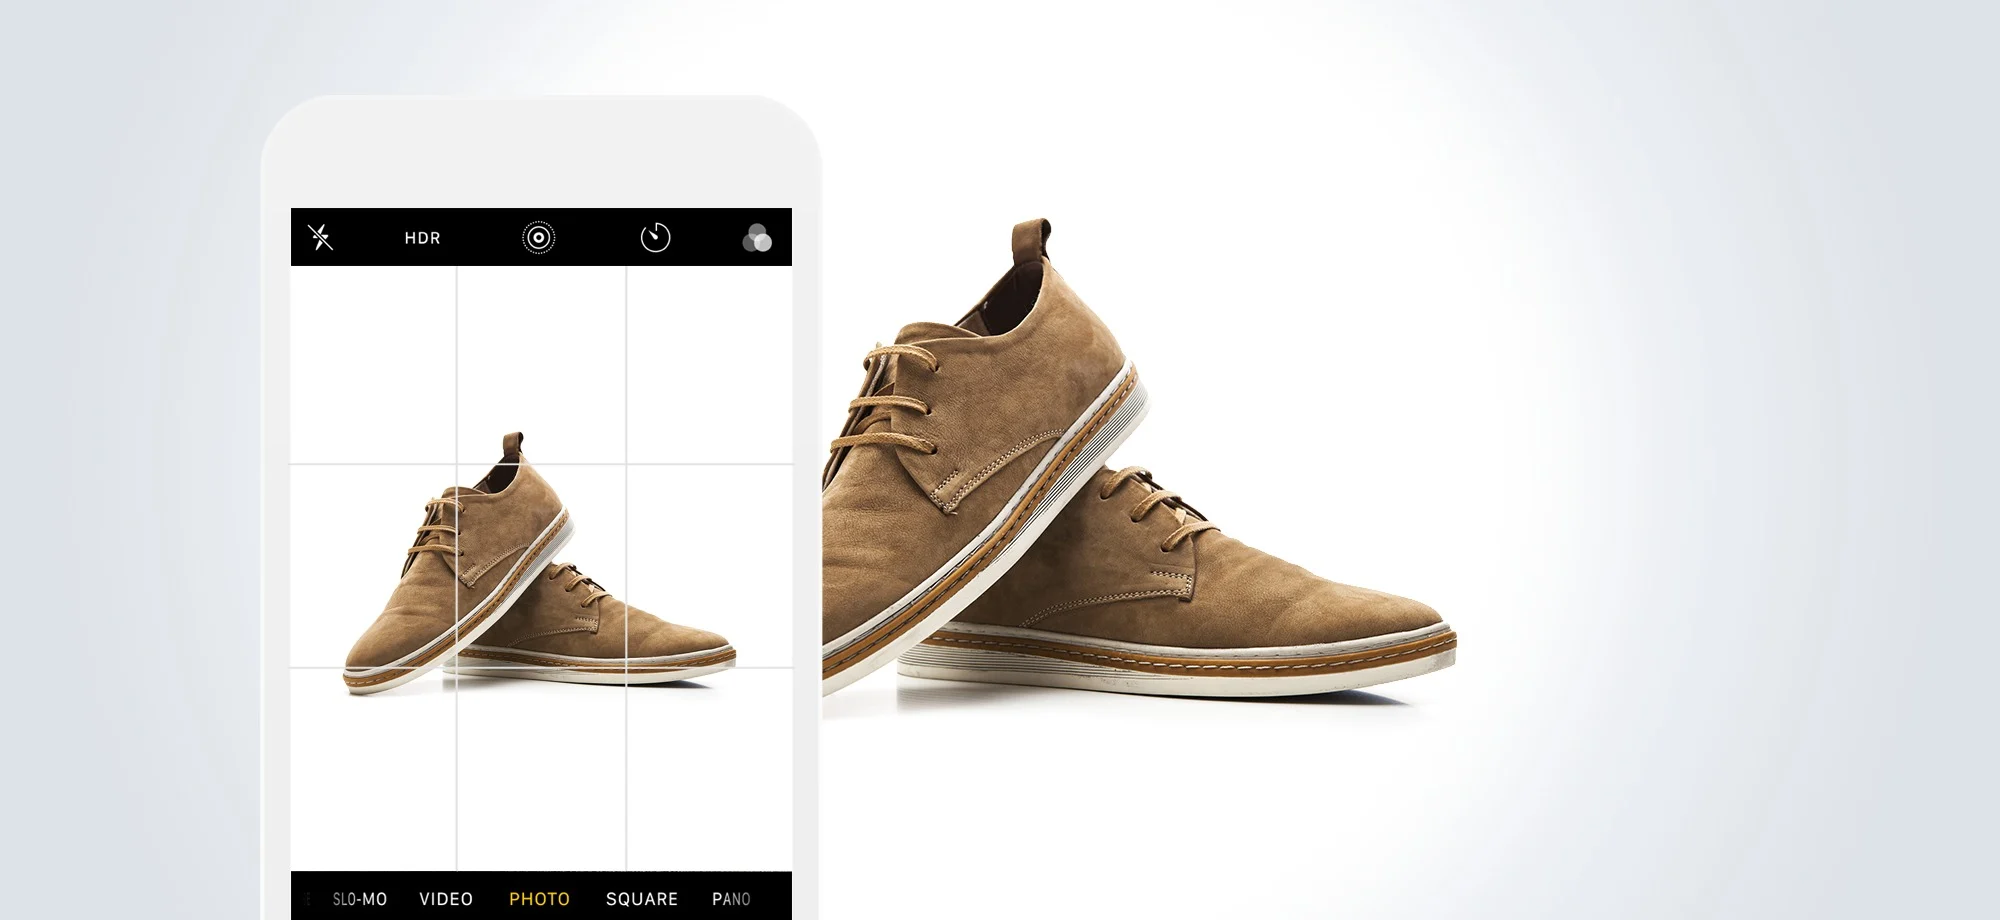
Before you spend money on a DSLR and lenses for your product photography, consider using the quality camera you carry around with you all the time: your smartphone.
You may be thinking that using your smartphone for product photography sounds a bit crazy, but that’s not the case any more. Today’s advanced technology makes it absolutely feasible to create great product images utilizing your smartphone’s advanced camera features and a tripod.
This option is both budget-friendly and user-friendly — not to mention convenient!
Using Your Phone as a Camera
Most smartphones in today’s market come equipped with great cameras. If you’re one of the many consumers who have purchased one of these devices, then you have a high quality DSLR alternative right at your fingertips.
What are the best phones for taking photos?
Below are a few smartphones that have great camera features for product photography:
Apple iPhone 7
Camera specs:
12-Megapixel camera
f/1.8 aperture (wide angle) or f/2.8 (telephoto)
HDR multi-frame image processing
Optical image stabilization
Quad-LED True Tone flash
Local tone mapping and white balance
Autofocus
Exposure control
Samsung Galaxy S8
Camera specs:
12-Megapixel camera
f/1.7 aperture
HDR multi-frame image processing
Autofocus
LED flash
Pro mode for manual settings (ISO, shutter speed, white balance, exposure)
Google Pixel & Pixel XL
Camera specs:
12-Megapixel camera
f/2.0 aperture
Large 1.55μm pixels
HDR multi-frame image processing
Extremely short capture time
LG G6
Camera specs:
13-Megapixel camera
f/1.8 aperture
Phase Detection Auto Focus (PDAF)
Resolutions: up to 4160 x 3120
Manual Mode – adjust shutter speed, ISO, exposure, white balance, and more; save image as RAW (JPEG + DNG)
Optical Image Stabilization (OIS 2.0)
HDR Options – set HDR mode to on, off, or auto
Recently, The Verge put each of the above phones in a shoot off against the others, comparing:
Color
Low light
Dynamic range
Dual camera functionality
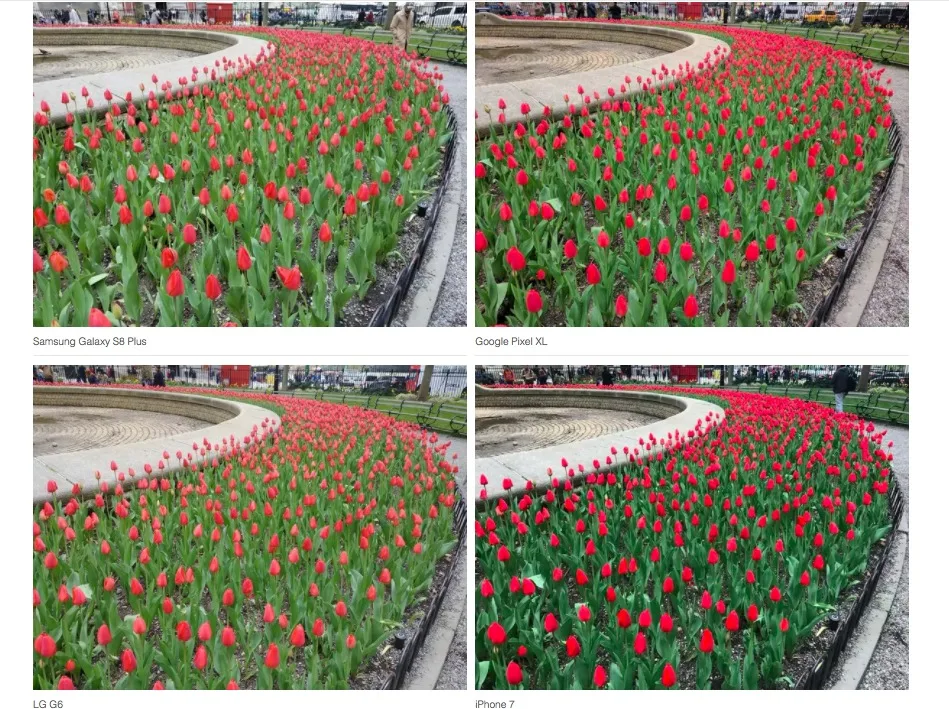
If you aren’t sure which to use, this post is a good walk through of quality in direct comparison to current competition.
Whichever smartphone you choose to use for the photoshoot, make sure that your device has autofocus and the maximum amount of megapixels possible.
Accessories
With all of the different accessories and gadgets that can be used with smartphones, it can be hard to decipher what you actually need to achieve great images.
We recommend using:
a backdrop
a table
a lighting setup
a stand or tripod and a lens to help your images stand out
Backdrop
Use a white or light gray backdrop behind your product to give your photographs a clean and consistent look and to eliminate distractions.
You can create your own backdrop easily by using a sheet, rolled paper, foam board or a wall. It is best to make a “sweep” so that your backdrop is not only behind the product, but underneath it as well.
This will greatly speed up your post-production workflow.
Table
Use a table so your product sits higher, which will make it easier for you to photograph your product during the shoot.
Depending upon the type of image stabilization equipment you choose to use, you may prop your smartphone on the table as well.
Light
There are many options for lighting, but the easiest and most budget-friendly option is natural window light.
Set up your product and equipment near a large window to allow for ample light in your frame.
If natural light is difficult for you to find, try using a larger lamp or renting a softbox-type lighting kit, depending on how big your object may be.
Image Stabilization
Using soft natural light makes for beautiful product photos, but it often creates the need for image stabilization equipment, such as a stand or a tripod.
Although smartphone cameras do contain internal image stabilization software, there will still be camera shake if you hand-hold your phone, resulting in blurry images.
For the best possible results, we recommend using a tripod. Here are a couple great options that can be used with almost any smartphone:
$15 – Gorilla Pod Mobile: The Gorilla Pod Mobile product is a great combination pack that includes a mount and stand. This is a small and compact tripod that can easily be placed on a table as you shoot your images, or twisted around a more elevated object. It’s very flexible and can be used in multiple positions depending on the situation.
$20 – Joby GripTight ONE Mount: If you already have a tripod or stand, this is a great option for smartphones. A bottom screw post will connect to most other tripods. This is extremely useful because some people use both large and small tripods to photograph their images. At its low price, this is a great universal and portable option to invest in while still being able to use what you already have. If you like this mount but don’t have a tripod, you can get the combo set including a gorilla pod, as well, for a just a few bucks extra.
Lenses
Believe it or not, you can use external lenses with your smartphone. Having them on hand is a good way to make it through tough lighting and focusing situations.
If you want to zoom in closer to your product and create a macro product image, for example, you’re going to need a macro or telephoto lens, since your smartphone will only be able to focus from a certain distance away from your product.
Be careful while shopping for lenses: the iPhone 7 uses a dual camera setup that won’t work with most lenses designed for older iPhone models.
Here are a few great lenses that can be used on smartphones:
$20 – Photojojo, iPhone & Android lenses: This is a great inexpensive lens collection. Photojojo allows you to pick and choose which lenses you include in your package, at about $20 per lens, or to simply try them all. The lenses work on iPhones and Android phones to enhance your camera’s perspective.
$59-$119 – Olloclip, iPhone lenses: Olloclip has a large and varied collection of nice lenses, designed for specific iPhone models. If you’re old-school, try a 4-in-1 model for the iPhone SE / 5, or if you’re more modern try the Core Lens Set for the iPhone 7 / 7 Plus.
$79-$99 – Moment, iPhone & Android lenses: If you’re willing to spend a bit more, Moment has some of the highest quality engineering available for smartphone lenses.
Choosing The Right Photo Editing Apps
There are a plethora of camera shooting and editing applications for your smartphone, so how do you choose the right one?
One thing to remember is that apps have been designed to help you use your smartphone to its full potential. We recommend that you start by consulting professional app reviews about which apps are the best. Award winners are a great place to start.
Below are a few apps that have received stellar reviews.
Shooting
For shooting, we recommend that you first try to use the default camera app that comes already installed on your smartphone. If you aren’t getting the results you want, then it’s time to try another application. Here are a couple suggestions.
$2.99 – Android Camera Zoom FX: This Android-specific app has been rated #1 in camera apps for Android phones. If you’re looking for a shooting application with a few more features than the default camera app, then try Camera Zoom FX to help boost your images to the next level.
$2.99 – iPhone Camera+: Camera+ is an iPhone-specific application that has been rated #1 in camera apps for iPhones. Using this application will allow you to harness your smartphone’s advanced shooting capabilities. The photos included in this tutorial were taken using this app.
Editing
Free – Adobe Photoshop Express: Adobe Photoshop Express is a free image editing application for both Android and iPhone smartphones. This quick and easy app might be all that you need in your post-production processing workflow.
Free – Snapseed: Snapseed is developed by Google and works on both iOS and Android devices. It has sophisticated but easy to use tools like healing, brush, curves, and selective filters. It has shot to to the top of popularity charts with avid fans among both professional photographers and casual users.
Shooting with your Smartphone
The Preparation Stage
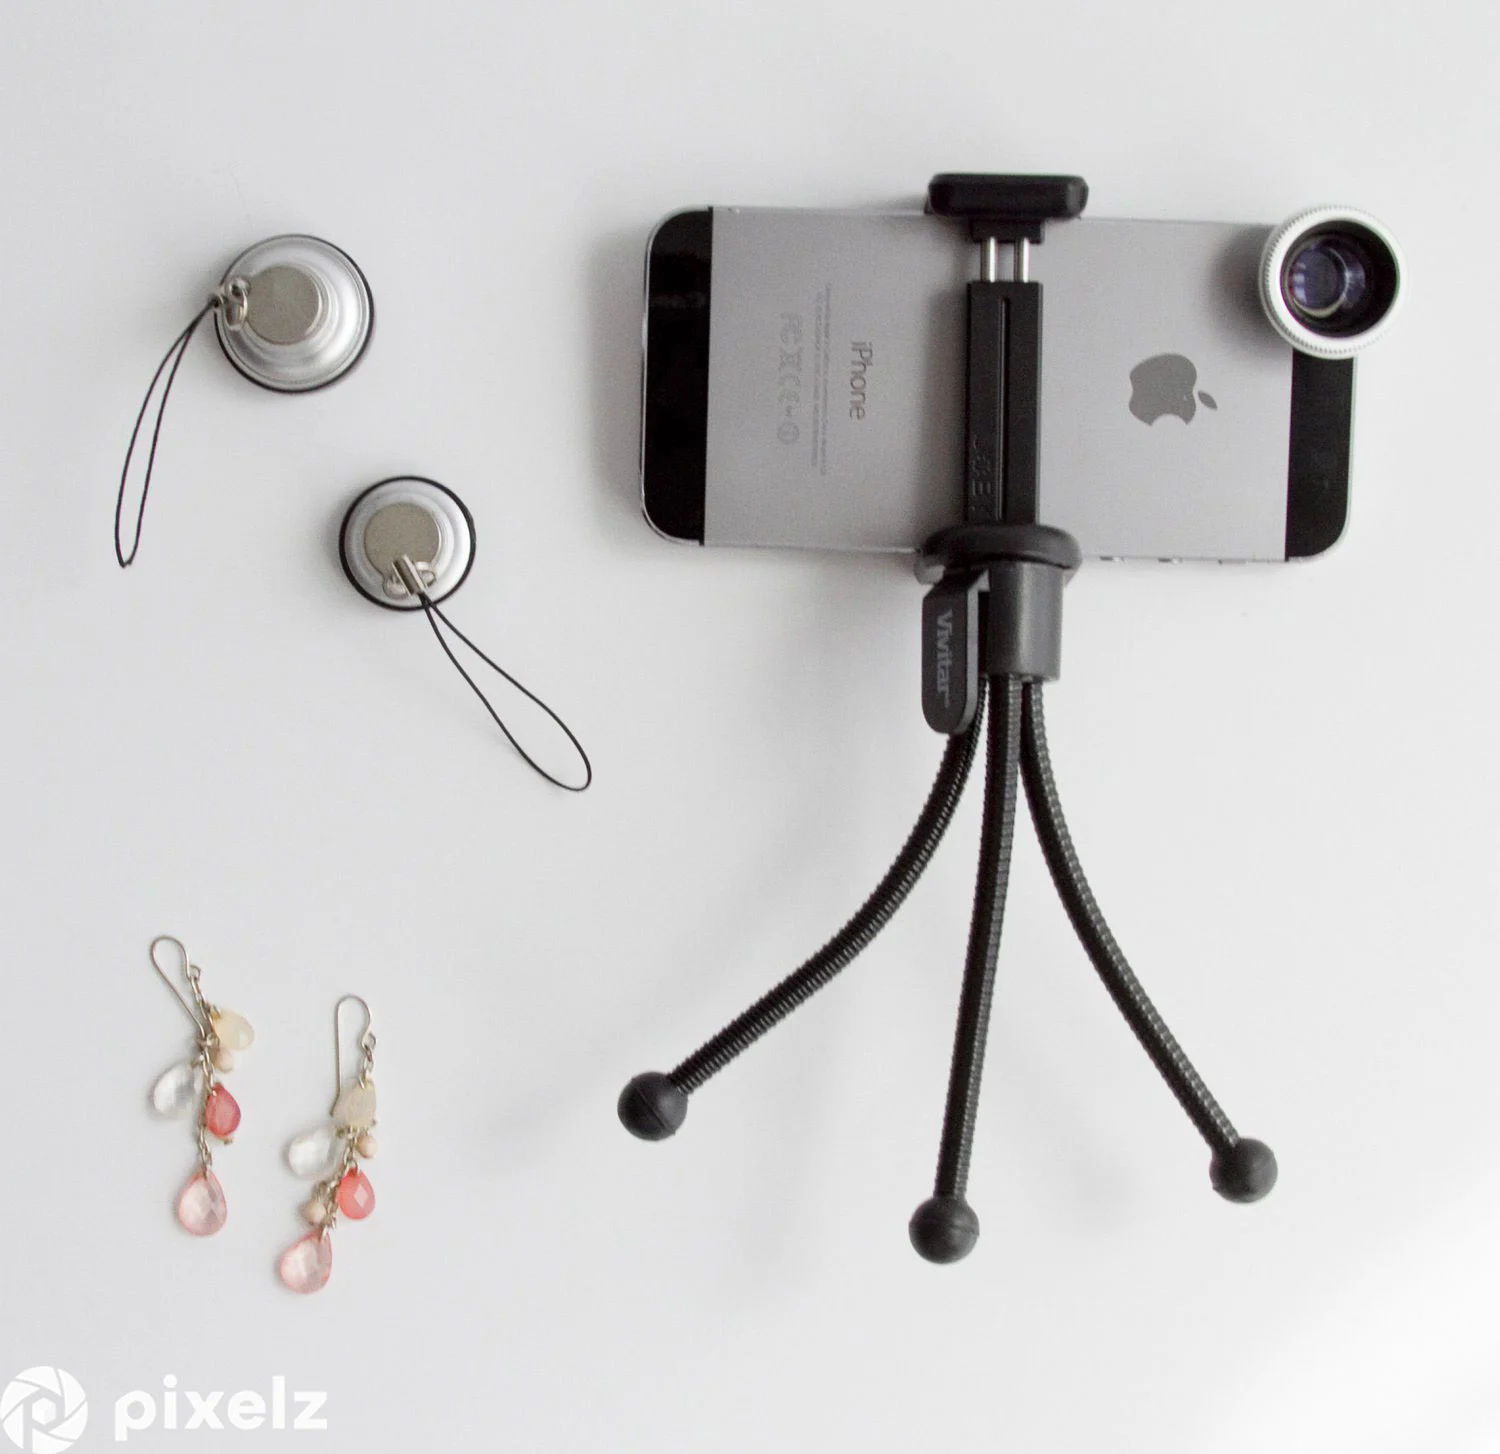
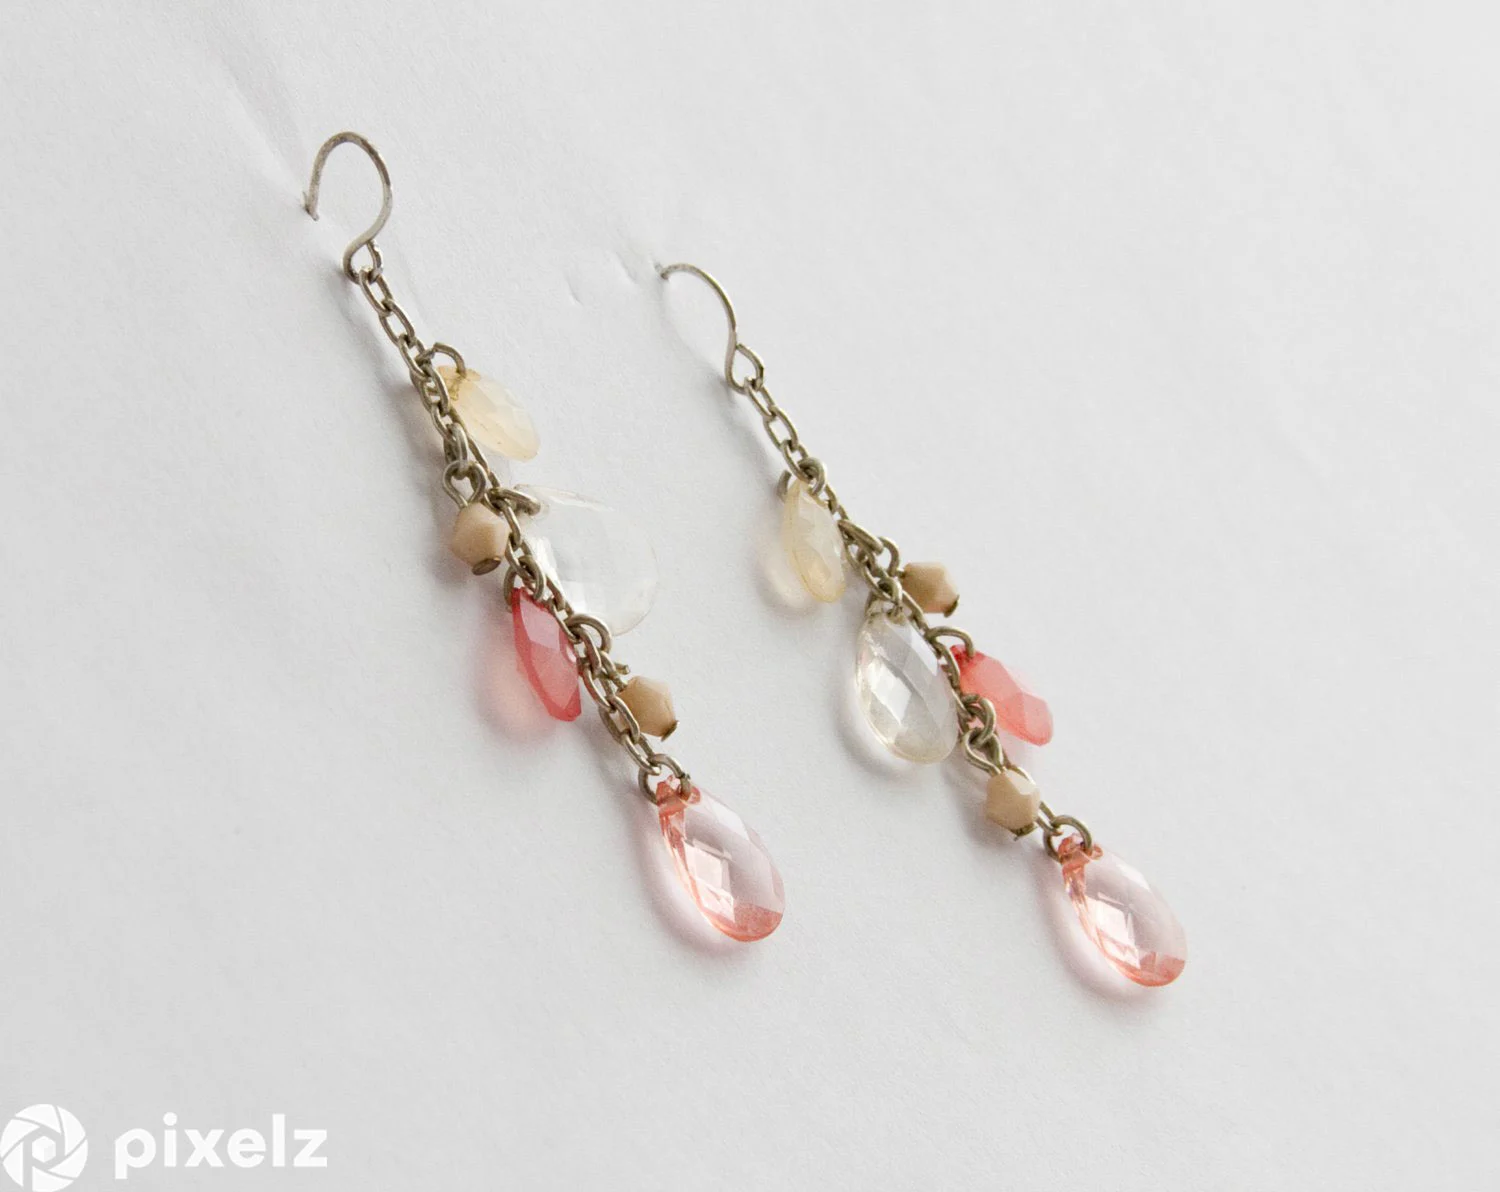
The equipment that we use in this tutorial is all pictured here.
After gathering all of your accessories and applications, it’s time to use your smartphone to capture your images.
For this tutorial, we will be photographing a pair of earrings with:
an iPhone 5S smartphone
a Joby Grip Tight mount attached to a Vivitar mini flexible tripod
Photojojo lenses
We will shoot the images using the Camera+ app, edit the images with Photoshop Express and store and organize the images using Dropbox.
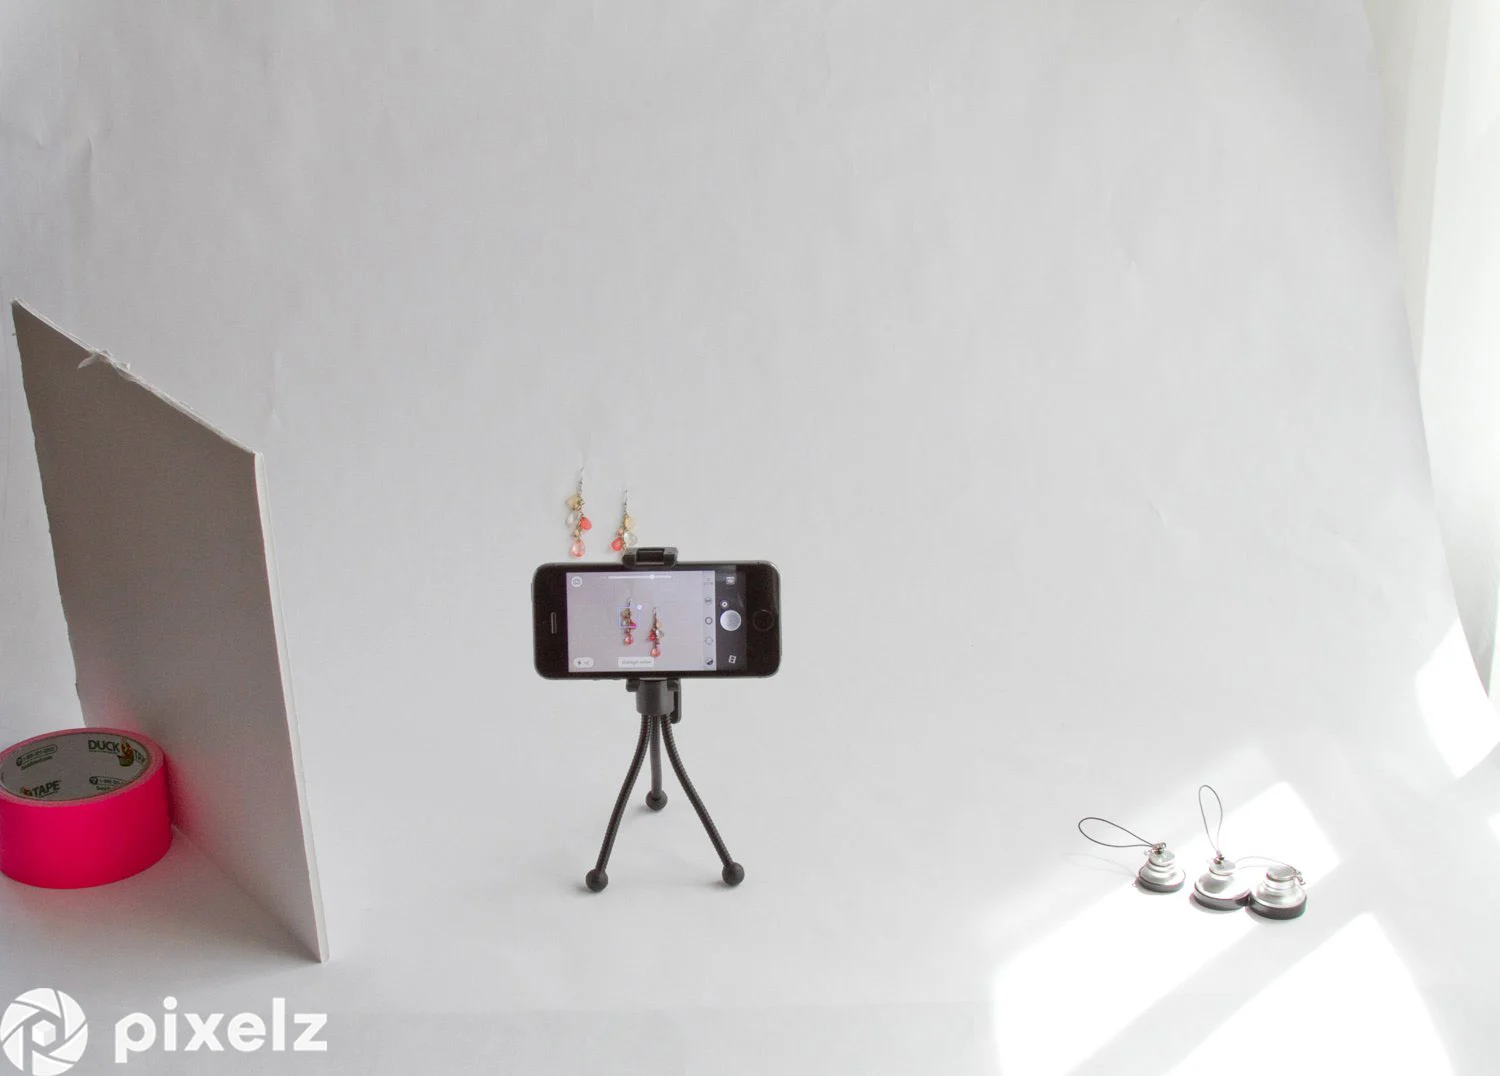
The foam board to the left bounces available light onto the “dark” side of the earrings.
1. Perfect your lighting
First, consider your lighting situation and choose to set up your studio in an area with ample available light.
We have used a large window to let soft natural light into our frame, as well as a small white foam board backdrop to bounce light onto the “dark” side of the earrings, as pictured above.
2. Set up your table and background
After perfecting your lighting, it’s time to set up your table and white backdrop so that you have something to place your product and tripod on.
We are using white seamless rolled paper for our backdrop, since earrings can very easily be displayed in a flattering manner by hanging them from the paper, as depicted below.
3. Stabilize and position your smartphone
Fill the frame with your product but leave enough space on all sides in case you need to crop the image.
Next, mount your smartphone and position it at the proper distance from your product in order to center your product in the frame, as shown above. Because our earrings are small, we have placed our tripod and smartphone roughly one foot away from our product.
By using a Photojojo telephoto lens, we will be able to zoom close enough to capture the earrings at an optimal crop from this distance.
4. Take care of the extra details
Before you begin shooting, make sure that your product is pristinely clean and that all price tags and strings have been removed.
Dust and minor damage can be fixed in post-production processing, but removing as many imperfections as possible before you photograph your product will save you a good deal of time later.
The Capturing Stage
1. Adjust the app settings
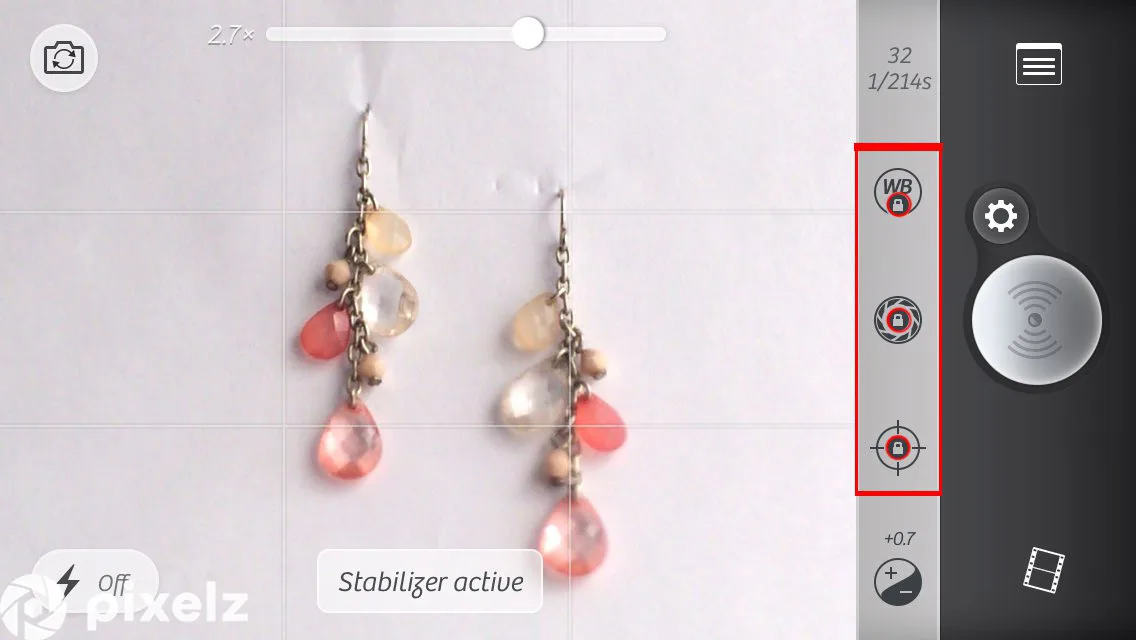
Now that your setup and product have been meticulously prepared, you need to properly adjust your camera’s settings to ensure that you receive the best results.
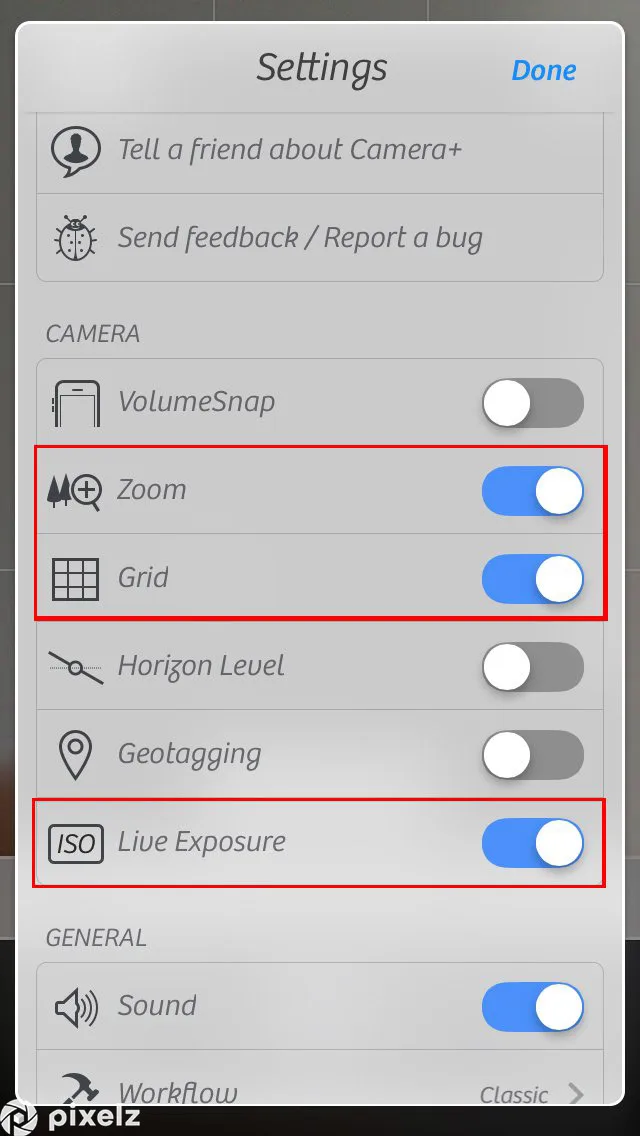
The settings circled with red are the ones we recommend adjusting.
Zoom: Make sure that you have the zoom feature turned “ON” so that the zoom feature is easily accessible if you need it.
Grid: We recommend leaving the Grid function “ON” because it will help you easily align your product in the middle of the frame.
Live Exposure: Live exposure mode will allow you to read your camera’s auto exposure settings as the camera adjusts it. It is good to take note of your exposure settings just in case you need to change them later.
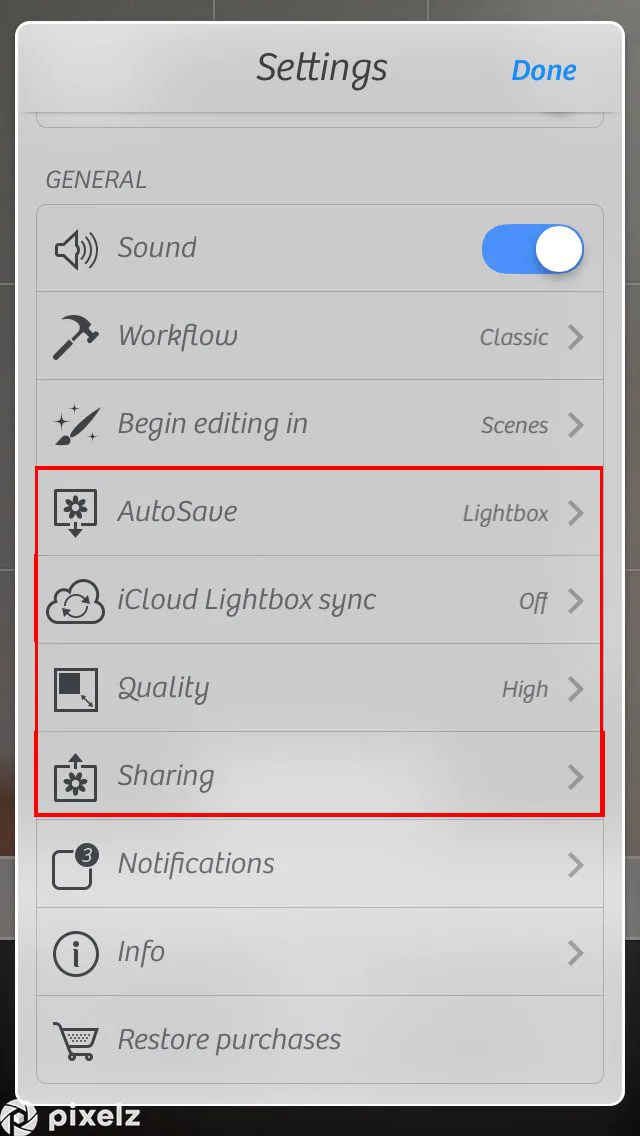
AutoSave: This feature will allow you to specify where images are saved on your smartphone as you capture them. The default is that images will be saved to the “Lightbox” contained within the Camera+ app, but you can change the destination if you would rather the images be sent somewhere else.
iCloud Lightbox sync: You can also sync your iCloud to your Camera+ Lightbox so every image you shoot will automatically be backed up into your iCloud.
Quality: It is very important that you set your image quality to High so your smartphone can help you create the best images possible.
Sharing: If you use Facebook, Twitter, or Flickr, try setting up this service to facilitate easy sharing after you’ve edited your images.
2. Adjust the camera settings
Now that you’ve properly adjusted your application settings, it’s time to work on changing the camera’s manual exposure settings to capture the best light within your frame.
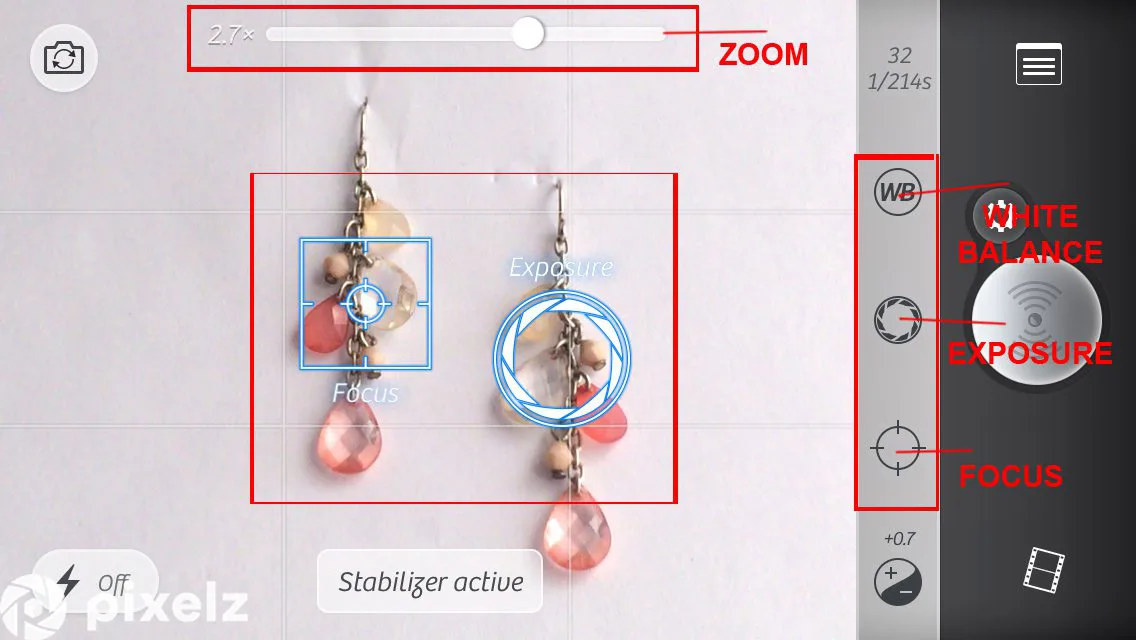
The settings circled with red are the ones we recommend adjusting.
Zoom: Pull the zoom slider at the top of the screen to adjust the frame around your product. Make sure all of the product fits inside the frame and make sure to leave enough room on all sides so you can crop the image if necessary in post-production processing.
White Balance: To properly set the white balance according to the light temperature in your setup, touch the WB button and then touch the white background.
Exposure: Touch the circular Exposure button and then touch your product so that the camera knows to properly expose the product.
Focus: Touch the circular Focus button and then touch your product so that the camera knows to properly focus on the product.
Lock: When you are finished adjusting each of these settings, make sure to tap each one again to lock the settings in place. This will keep the camera from auto-adjusting the settings while you are taking images.
Take a look at your image and see if you think it needs to be brightened or darkened in order to achieve a proper exposure.
If you think the exposure needs tweaking, touch the +/- button below the circular Focus button and pull the slider up or down to change the exposure.
Our exposure needed to be brightened. We began with the screen on the left and used the exposure slider to brighten the image several stops to create the screen on the right.
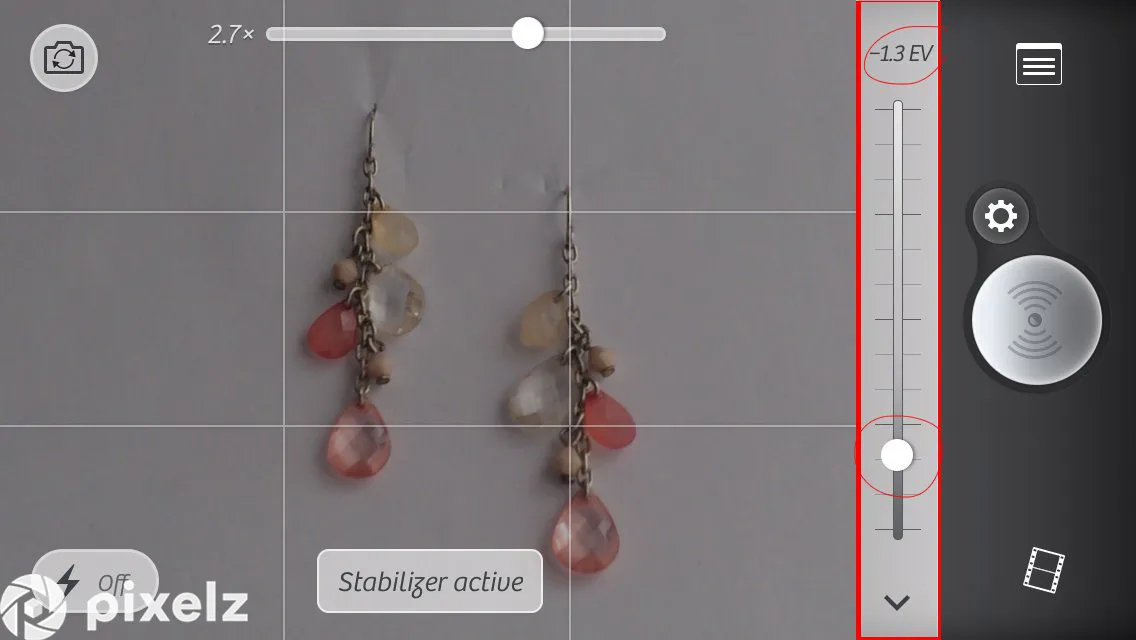
darker -1.3 EV
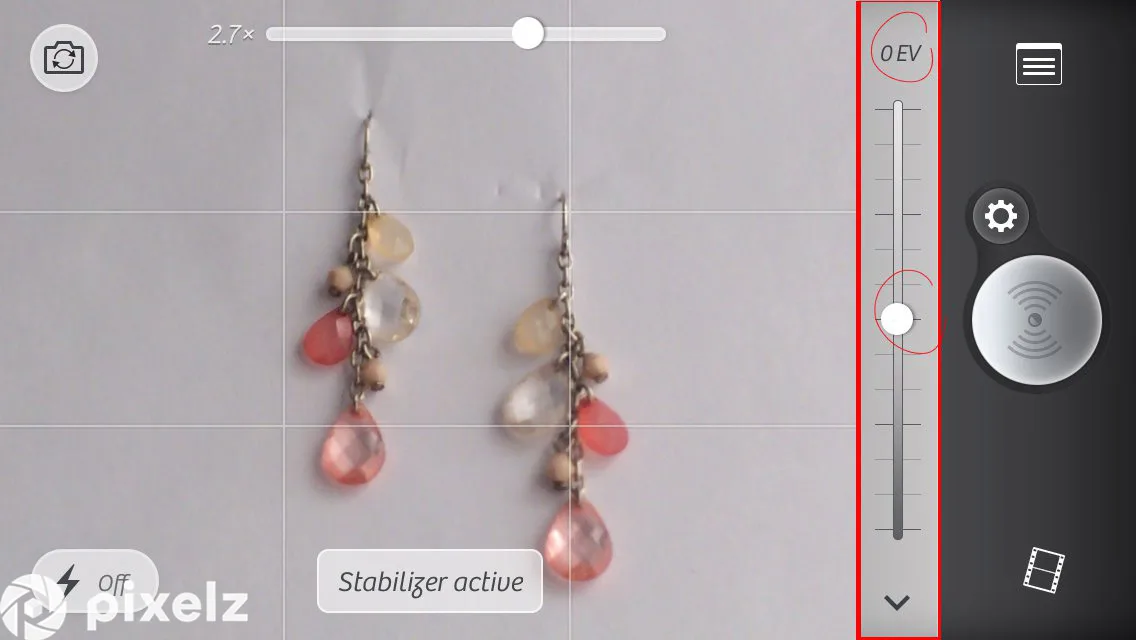
middle 0 EV
However, we still didn’t feel like the setting 0 EV really did the earrings justice, so we bumped the exposure up again to +0.7 EV. Now, it looks great!
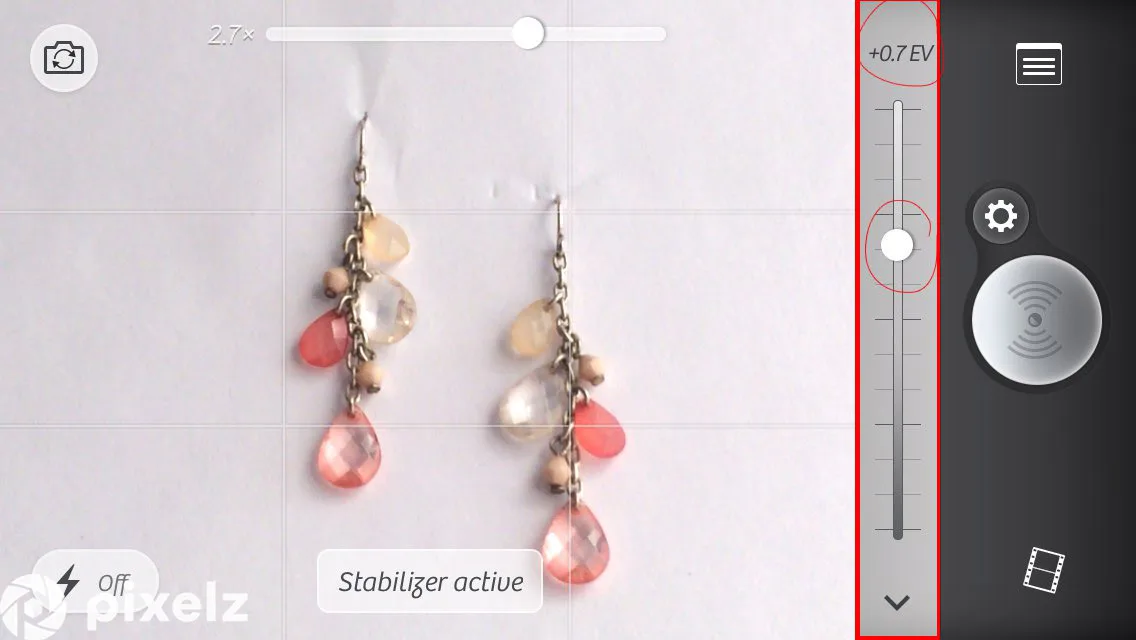
brighter +.7 EV
3. Capture the image
Now that all of the settings have been adjusted and you have perfected your exposure, composition, and other elements of your image, it’s time to make a photo by pressing the big round button from the menu.
The button outlined in red is the shutter release button.
If you’d like to get even closer, try using your lenses to capture close-up detail shots with a macro lens or use a telephoto to zoom closer to your product from a distance.
Switching lenses and/or zoom lengths will allow you to capture additional angles and create multiple images for your product listings, which will raise the overall appeal of your product.

Zooming closer with a teephoto lens allows us to capture the detail shot of the earrings seen on the right.
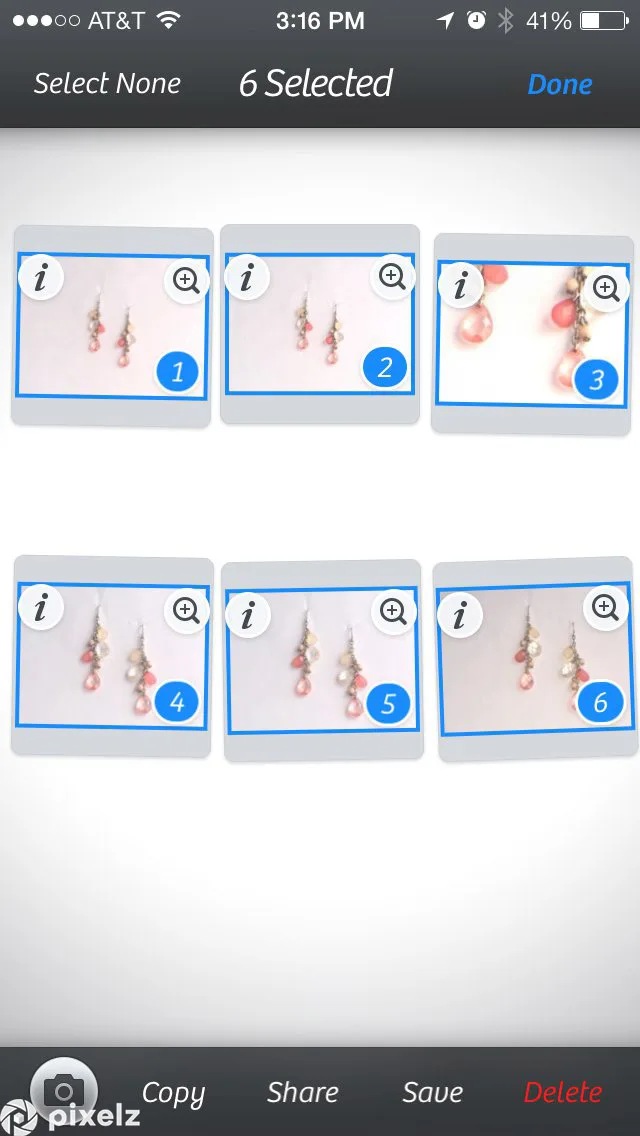
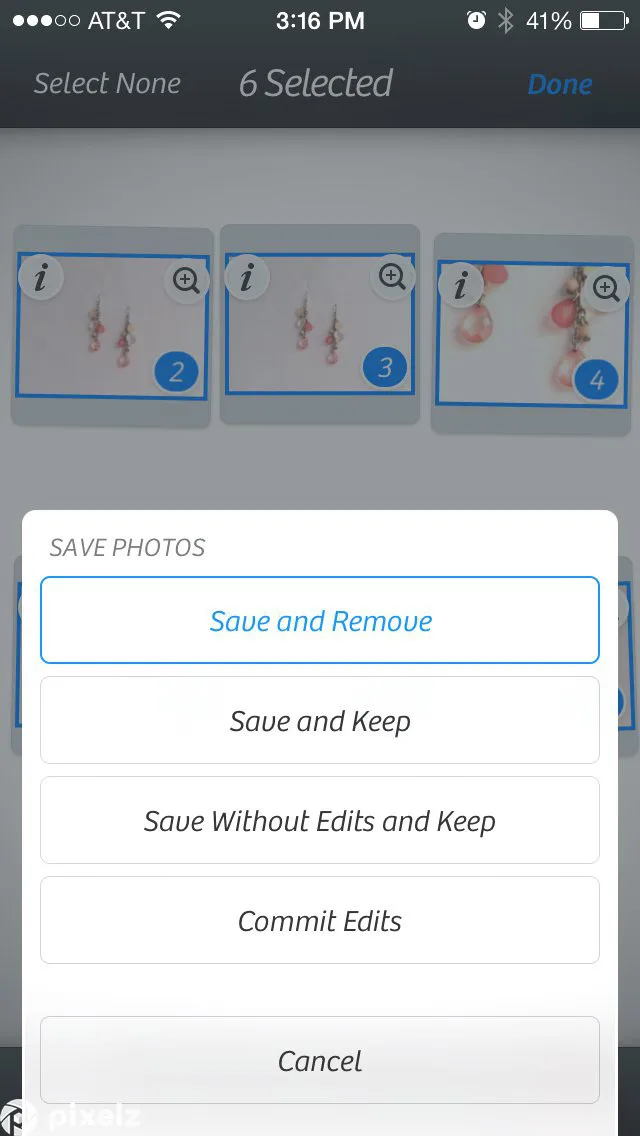
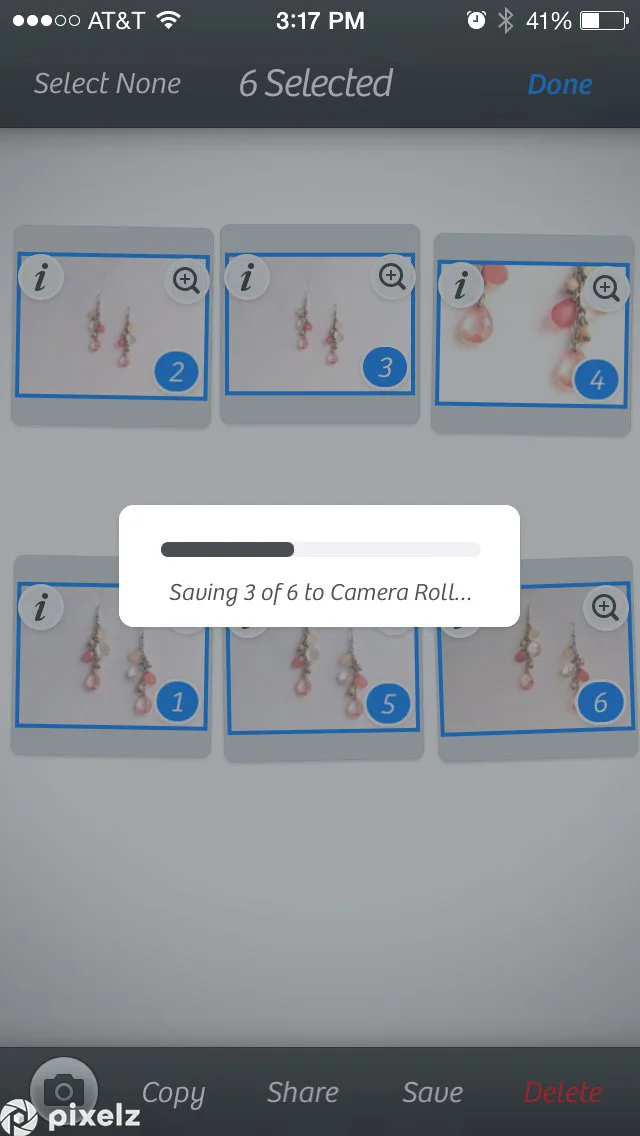
Since we saved our images into our Lightbox in Camera+, we will need to move the images into our phone’s “Camera Roll” to be able to edit them in Photoshop Express.
To do so, touch the filmstrip at the bottom of the app, select the images you would like to save to your camera roll, and touch either “Save and Remove,” “Save and Keep,” or “Save Without Edits and Keep.”
The Editing Stage
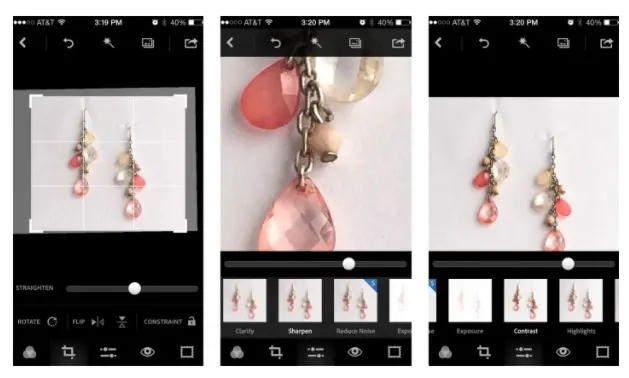
Now that we have our images saved into our phone’s Camera Roll, we will open up our editing application, Photoshop Express, and choose the images we would like to edit in order to prepare them for the web.
All digital images need a little bit of tweaking to really shine. Here are a few basic adjustments that we recommend making to enhance your images:
Crop & Straighten
Sharpen
Contrast
Shadows
Vibrance
Crop & Straighten Sharpen Contrast
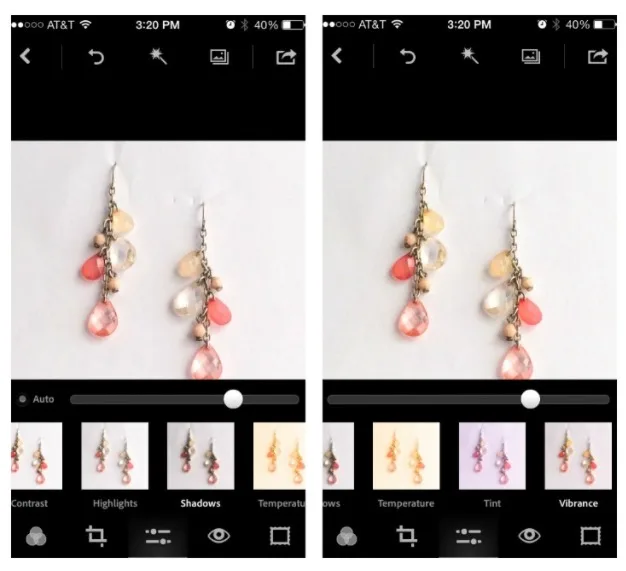
Shadows Vibrance
After making just those basic five adjustments, you should notice a huge quality boost in your image, as we did.
Here are the before (left) and after (right) images — which one do you think looks better?

Before After
The Outsourcing Stage
Now that you understand the foundation of smartphone photography, you can build out a workflow for any product type.
For more information on how to shoot specific product categories with a smartphone, here are some good resources:
After you are finished capturing your images, you can send them off to a professional outsourcing company like Pixelz who can really make your images shine.

Thomas Kragelund is the CEO and founder of Pixelz, a leading product image solutions partner for internet retailers, bloggers, designers, photographers and webmasters worldwide. He has been working in ecommerce for the last 15 years. Sign up today and get 3 product images edited for free.